FENCE CONSTRUCTION
LEADOUTS
Use at least one 12½ gauge double insulated cable as your
leadout. Two or more joined in parallel are better, as this lowers
the resistance of the wire. See the table below For "Wire Resistance".
Leadouts can be run either overhead or underground. Underground
is preferred, as there are less chances of the leadout being interfered
with by high vehicles. Where leadouts are being run underground
in high traffic areas, it is recommended that the leadout cable
or cables are run through irrigation tubing as an extra safeguard
against damage. Using insulated cable as a leadout has several advantages.
No chance of shorting out on sheds or the
ground
Totally waterproof
Easily installed and long lasting
The longer a leadout wire, the greater it's resistance. Resistance
of the wire is one of the biggest problems to overcome. Larger diameter
wires create less resistance and therefore better current flow.
WIRE
DIAMETER (Gauge) |
RESISTENCE (Ohms per mile) |
8 |
22.5 |
10 |
35 |
12½ |
56 |
14 |
87 |
16 |
145 |
|
The table above shows the Ohms resistence
of galvanized steel fence over 1 mile. The lower the Ohms the
lower the resistence.
Different metal types have varying resistances. For example, 1
mile of 11 gauge aluminum wire has only 18 ohms resistance. Aluminum
wire makes an excellent leadout over very long distances but it
is at least double the price of conventional steel wires.
PRACTICAL SUGGESTIONS FOR LONG LEADOUTS
- Use bigger diameter wires i.e. Use 10
gauge or 8 gauge wires instead of 12½ gauge.
- Run wires in parallel. Run two or more
wires along the fenceline side by side and connect these wires
together at each strainer post. (see diagram below) Two wires
together will halve the resistance and three will reduce it to
only 1/3.
- Use aluminum wire for leadouts. Aluminum
wire has only 1/6 the resistance of steel wire. It does not have
the same tensile strength however, so a minimum diameter of 11
gauge is recommended.
Always connect your live and ground wires in parallel at both
ends of the strain.

STRAINER ASSEMBLIES
There are several ways of installing a strainer assembly, the most
important thing to remember is that it must be able to withstand
the strain applied to it.
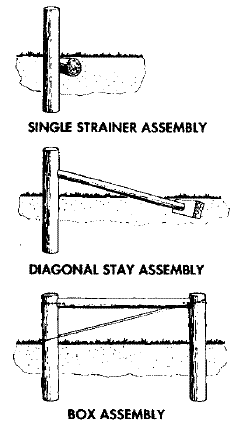 |
SINGLE STRAINER ASSEMBLY
This simple end assembly provides an economical alternative.
It is best suited for hard ground and short strains.
DIAGONAL STAY ASSEMBLY
This construction is more effective
and rigid than the single type.
BOX ASSEMBLY
The box assembly is best suited to
very soft ground or in areas where there is a lot of ground
movement. |
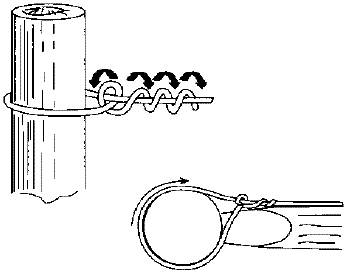
WIRE TIES
When tying off the wire at the strainer post
it is important to make a good strong self locking knot.
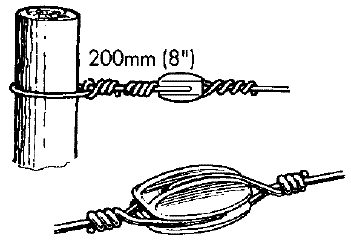
TYING OFF END STRAIN INSULATORS
It is important to make a good strong knot
when tying off end strain insulators. Use a simple twist knot, wrapping
the wire around itself at least 4 times, keep the insulator within
8" of the strainer post to prevent animals pushing between
the insulator and strainer post.
When tying off end strain insulators always
tie the wires so they strain from the center of the insulator.
WIRE
For most fences it is recommended that 12½
gauge high tensile wire be used. If you have long leadout wires
or have corrosion problems (from salt spray etc.), then a heavier
gauge wire such as 10 gauge or 8 gauge should be used. NOTE: Never
electrify barbed wire.
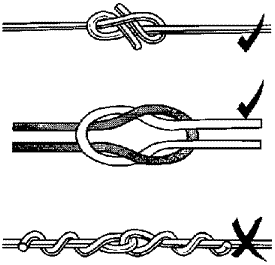
WIRE JOINS
Incorrectly joined wires can be a major cause
of power leakage. When joining wires together in the middle of a
fenceline use either a figure 8 knot or a reef knot.
WIRE TENSION
Wire on an electric fence does not require
the same tension as conventional fences. The recommended tension
is between 180 - 220lbs (800 - 1000 Newtons).
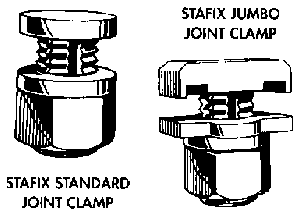
JOINT CLAMPS
When clamping wires always use Stafix joint
camps to ensure positive contact between the wires, in turn preventing
loss of voltage. It is advisable not to use clamps of different
metals as there is a high risk of causing electrolysis and accelerating
corrosion, increasing the resistance on the fence line.
POST INSULATORS
High quality insulators are important in
preventing leakage from the fenceline Stafix insulators are designed
for use with today's high powered energizers.
They are made from UV stabilized high density
polyethylene and have molded shields to protect them from "tracking"
i.e. current flowing across an insulator from an electrified wire
to the post.
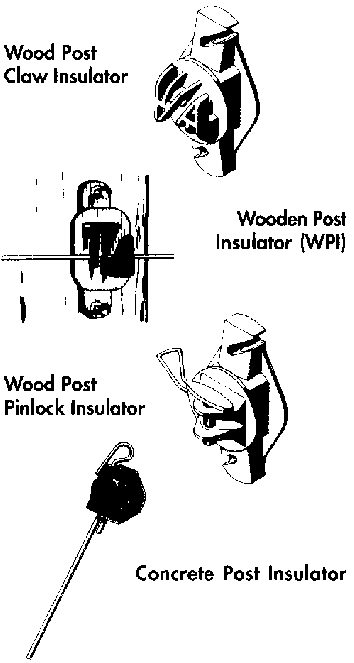
The following insulators are also available,
however, they are not recommended for use with high powered energizes:
Supershed Insulator Heavy Duty staple-on
insulator for wooden posts.
Nail On Insulator For wooden posts.
Insultube available in 4" and 6"
lengths and suitable for 12½ gauge wire.
ELECTRIFYING CONVENTIONAL FENCES
By using <
offsets (also known as "standoffs or outriggers")
to run electrified wires:
- You can reduce stock pressure on existing
conventional fences. This will extend the life of old fences and
add years to new ones.
- Old conventional fences can be rejuvenated
by running an electrified wire both sides, either on the top of
the posts to stop animals leaning over the fence or by attaching
an offset to the fence at about two thirds of the height of the
animal being controlled. This will stop animals rubbing against
the fence.
- When attaching offsets to an old existing
fence, it is important to check that all wires are in good condition.
Broken wires can come in contact with the electrified wires and
cause shorts. Be sure to space outriggers no more than 16-22 yds
apart. Position the offsets as close to the line posts as possible
for rigidity.
Stafix has a large range of offsets which
can be attached to either existing wires or can be hammered into
wooden posts.
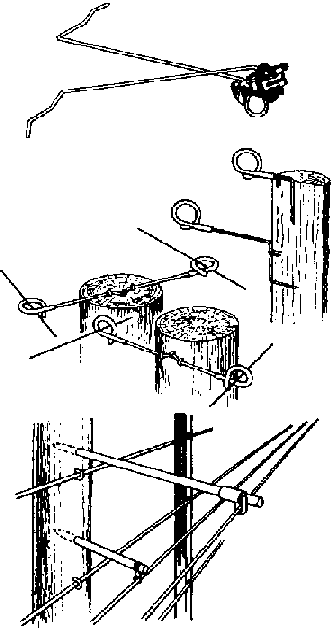 |
WIRE OFFSET
These are attached by twisting them
around fence wires. They come with either porcelain or pinlock
insulators.
STEEL OFFSET
These are for driving into timber posts.
They are available for fixing to the top or the side of the
post and are driven directly into the post.
FIBERGLASS OFFSET
These can be driven into timber posts
(drill a pilot hole first) and can also be used for most concrete
posts. They are available in 12" lengths and come with
either a fixed nylon clip or with a moveable steel clip. |
GATEWAYS
When crossing gateways it is recommended to use insulated 12½
gauge cable buried at least 12" underground. In heavy traffic
areas, run the insulated cable through irrigation tubing for extra
protection before it is buried. Ensure that the ends of the tubing
are turned down to prevent water from entering.
Overhead crossings are not recommended as
they are susceptible to damage.
Points to remember:
- Attach each end of the insulated cable
to the fenceline with joint clamps.
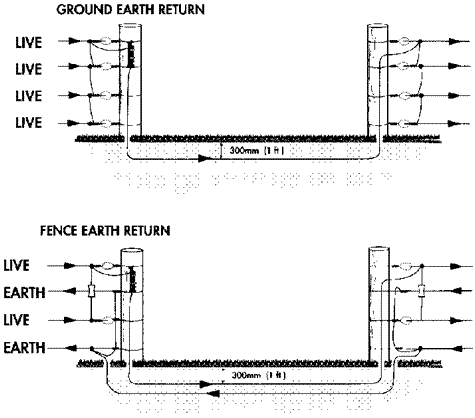
- If the fence system is a fence ground
return system, run a ground cable as well as the live cable under
the gateway.
- Always use 12½ gauge cable as it
is more conductive than 16 gauge cable
- Never use household electrical cable under
gateways.
- Never use spring gates or tape gates instead
of insulated cable to carry the current across the gateway.
- Where there is a ground cable and a live
cable crossing a gateway, mark the cables to prevent cross-connection.
- Always allow extra cable, to avoid joins.
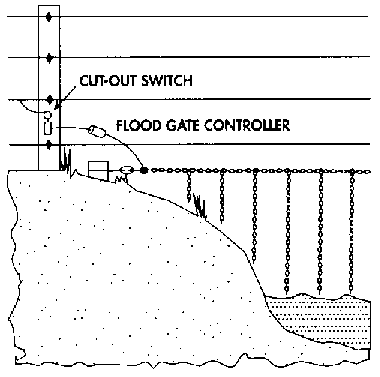
FLOOD GATES
Flood gates are ideal for use in creeks,
river beds and other areas prone to flooding.
Strain a wire between two posts (one on either
side of the creek). Clamp on lengths of galvanized chain hung at
intervals of 6". For large animals this can be increased to
12". The length of the chain is kept to 12" above the
lowest average water level.
The flood gate controller (energy limiter)
is connected between the fence and the flood gate. This limits the
amount of power on the flood gate during a flood so that the remainder
of the fence continues to have a high voltage. Placement of a cutout
switch is recommended where there is a likelihood of water levels
remaining high for extended periods of time.
TEMPORARY FENCING
Temporary fencing gives you the versatility to strip graze, make
temporary paddocks or pens, protect trees, gardens or other areas
from unwanted damage caused by rodents and other animals.
Intensive grazing has a number of benefits:
- Ensures maximum use of available pasture,
particularly in times of feed shortage.
- Enhanced pasture growth.
More controlled and even grazing.
- Areas that are not normally fenced such
as cropping paddocks or road frontages can be quickly and easily
fenced and grazed.
- Improved financial returns from increased
production.
- Intensive grazing is ideally suited to
cattle and sheep but can also be used for other animals such as
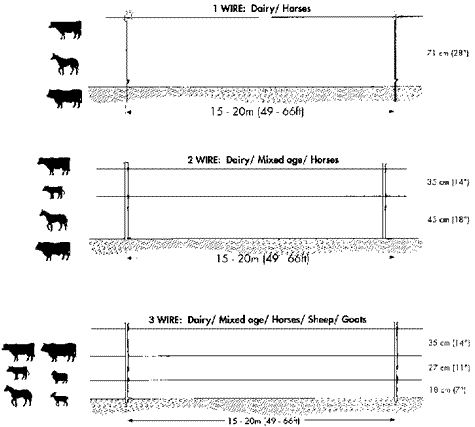
horses, goats, and deer. Cattle can be grazed using a single wire.
If mixed aged cattle are being grazed together then two wires
may be required.
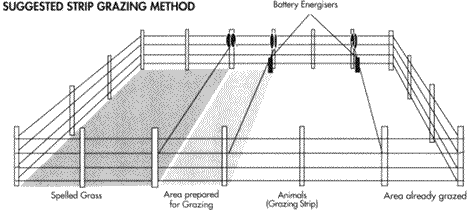
SUGGESTED INTENSIVE GRAZING METHOD
Generally the fence is moved daily and the
distance it is moved is based upon the number of animals being grazed
and on the quality and quantity of available pasture.
A back fence should also be erected to stop
the animals from returning to the areas already grazed, thus allowing
a quicker recovery of the pasture.
Sheep and Goats can be grazed in the same
manner as cattle but require three wires instead of a single wire.
Alternatively, portable netting such as Flexinet may be used.
Deer require at least four wires. For any
other animals that are being grazed, wires can be set up depending
on the animals height.
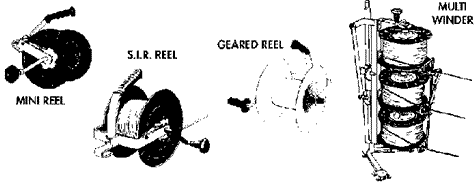
Stafix Politape and Poliwire are ideally
suited to temporary fencing as they are extremely flexible and light,
yet very strong and they wind easily on to fence reels.

|