
Subtotal $0.00

Resources


Planning and Installing High-Tensile
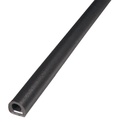
The six-wire fence is a popular high-tensile fence. It
can be electrified to make it more secure, but it will generally
keep stock from escaping even if the electric is off for an extended period
of time. The 60 inch high anti-deer fences, 48 to 54 inch high cattle
or horse fences, and 42 inch high sheep fences are all examples good six-wire
electric fence variations. Compared to non-electric fences, you'll enjoy
major savings by using wide post spacing (20 to 50 feet) and lighter
end bracing. The six high-tensile wires do not appear to be easy to get
through, are almost impossible for animals to break, and often last for
over forty years. This fence looks great and it works! 
Can you afford this fence? High-Tensile fencing is very low in cost when compared to other options, especially when considering its long life-expectancy. You could put up the fence today and likely never need to replace it in your lifetime. While wire and associated hardware may be less expensive for the 16 acre package listed, the most expensive parts of the fence are posts and labor. If you find a contractor who supplies all the material and labor to build a six wire fence, the cost is likely to be over a dollar a foot. If you do not have the time, a contractor may be your best option. If you need a good contractor, check with us. We may know of a contractor in your area who is a Kencove customer. If not, Kencove can help advise a crew interested in learning how to build high-tensile fences. We have helped start many independent fence builders.
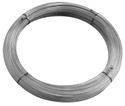
Let's go through some of the steps required to build this fence. Decide what you are going to do about the main tools you need. You could try digging the post holes by hand, dispensing the wire without a jenny, and hand knotting the wire. Most people will not enjoy that big of a challenge if there is a lot of fence to install. I believe the spinning jenny is the most essential tool. High-tensile wire comes in about a 21 inch diameter coil with no spool. It is easily dispensed with a turn table (spinning jenny). You may want to build a plywood spool around the coil. Most people end up buying a Kencove spinning jenny. Using nothing to dispense the wire is an easy way to end up with a tangled mess or an injury.
The biggest labor-saving tool is a tractor-mounted post driver. Posts are set very quickly and are tight. A good driver may cost $2500 or more. If you have a lot of fence to build, it will pay for itself in labor savings alone. If you are lucky you may find a neighbor willing to rent a post driver to you. Some contractors are willing to just drive the posts.
A post hole digger will work for you, but it will take more effort and time. The end and corner posts need to be placed four feet into the ground and the lower 1/3 of the hole should be concreted to keep the post from lifting out of the hole.
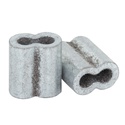
We recommend a crimping tool used with the proper number of crimping sleeves for your specific application. This will maintain the full strength of the wire, and also makes a neater connection. Even if you have an expert personally demonstrating the hand-knotting technique, it takes a while to learn how tie the stiff wire properly. Expect to lose 1/3 the breaking strength at an in-line splice with the best knot.
In planning your new fence, the first thing to do is find the length of your fence. An easy and economical way to measure the footage to be fenced is to step off a known distance and figure the length of your average step. With that information you can now calculate the total length of your fence perimeter after you've walked its distance while counting your steps. Now draw a rough map of the fence, showing lengths, gates, ends, corners, and other special terrain considerations you may have in your pasture. This is an excellent visual aid and will go a long way toward keeping you organized as far as actual fence construction and materials lists are concerned.
We have included for your information a chart comparing approximate perimeter footage of fence lines compared to acreage:
Perimeter estimates:
|
||||||||||||||||||||||||||||||||||||||||||||||||||||||||||||||||||||||||||||||||||||||||
Use this chart for estimation purposes only. It is always the best practice to measure the fence line distance as accurately as possible in order to purchase the correct amount of materials. Remember when the fence around a square pasture is doubled in length there is four times as much land inside. An easy way to remember the square footage in an acre is to remember there are 640 acres in a square mile. (5280' x 5280' ÷ 640 acre = 43560 ft² / acre)
The materials list for our 15 acre, 3280 foot perimeter example fence has supplies for three corners and two ends. Since there is over a half mile of fence, there are two sets of in-line wire tighteners for each strand.
The first posts to install are the 5 to 6 inch diameter (measured at the small end) corner and end posts. It is best to lean the posts 2 to 4 inches away from the pull of the wire. This will help prevent uplift in the future - the most common problem of end posts.
Now pull the starting end of 12½ gauge wire out of the coil you have placed on the spinning jenny. This will be the lowest strand of fence wire. Holding the end of the wire firmly, walk along where the fence line will be, being careful to pull at a steady pace and slow down to stop gradually. You can pull around several corners without tying it off. In this example, you will pull the wire around one corner and do your permanent tie off (termination) at the next corner. When you get to this corner post, do your termination by crimping with two C23 sleeves or hand knotting.
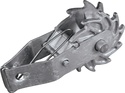
Go back to the end post near the spinning jenny and wire. Pull the slack out of the wire and cut it so you have enough to tie the line off at that end post and attach it, again using crimp sleeves or a hand-tied knot. Move to the frictional center of the line. Pull on the wire to get all the slack to that point, cut the wire then thread two crimp sleeves onto one wire end (it doesn't matter on which end you place the sleeves, however you probably will want to make sure you place the tighteners on each wire the same way so that they present a uniform appearance and tighten in the same direction.) Put the wire through the hole in the strainer's strap, bend it around and insert the cut end through the other holes in the crimp sleeves and crimp them. A slight bend in the wire will make insertion into the crimp sleeve much easier. It is much easier to use the leverage of longer lengths of wire to set the bends. If you don't like the looks of large loops, cut off the excess after the bends have been set. The other wire goes into the hole on the strainer's spool. Don't crimp the wire into the hole of the spool or put the wire too far through the hole (1/4 inch out of the other side is enough).
Using your strainer handle, tighten the wire by turning the spool (try not to have left so much slack that the spool is too full.) This is your guide wire for setting the other posts, so try to make sure it is straight. Go back to your spinning jenny and pull out your guide wire for the other half of the fence. Tie off each end and install the strainer in the same manner as before.
You should now have a straight line of guide wire for line post placement. Install the remainder of the line posts about a half inch away from the guide wire. Normally these posts should be positioned so the animals push the wire toward the posts; the wire should be on the inside of the fence, closest to the animals. The only exceptions are on the corners, where the wires should be on the outside of the posts. The first brace post away from the end or corner posts should be carefully set into the ground so the top brace rail just fits between them.
Remember, it is much easier to cut a post than to stretch it. Try to have the top rail at least 8 feet long, 10 feet is better. Install the top rail centered between the top two wires. An easy way to do this is with a marked stick which is the length of your post after it is set in the ground. Mark your wire spacings on the stick. Then use this stick, and crayon or chalk, to mark the wire heights on all the end and corner posts. This will help in placing the top rail at the correct height. Your marked stick should also be used to mark your line posts with the planned wire spacings. This ensures consistent wire spacing along the entire length of your fence. You can mark your line posts as you go along or do them all at the same time.
On the end or corner post, drill a 3/8 inch hole two inches deep halfway between the marks for your top two wires and install the 4 inch brace pin. Drill a hole 2 inches into the center of one end of the top rail. Now drill a hole through the post supporting the other end of the brace rail. Push the brace rail onto the 4 inch pin and position the other end so you can drive the 9 inch pin into its center. Do not drive the pin flush. Leave an inch sticking out.
Two inches above the ground on the outside of the end post drive a staple (for the brace wire.) Leave one-half inch sticking out. Attach the wire to an in-line strainer and pull it off the jenny until you have two complete diagonal loops around the brace posts. These loops should cross each other in a figure 8 shape. The staple should be holding the wire down on the end post and the inch-long stub of 3/8 inch brace pin should be holding the brace wire up to the height of the brace rail on the second post. Cut the wire and install and take up the slack with the in-line wire tightener. You have now built your brace.
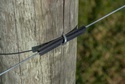
Begin pulling the second fence wire out, stopping along the way to install the brace wires for any corners and at the other end assembly. At the far end post, install a wraparound insulator before tying off. This wire will be tied off in the same manner as the guidewire (first wire.) Remember, this wire will have wraparounds on the corner posts and tube insulators on the line posts. Count the posts. Keep track of how many posts are on each side of each corner. This will be important when threading the tube insulators (one for each line post) and wraparounds (one for each corner post) onto your wire.
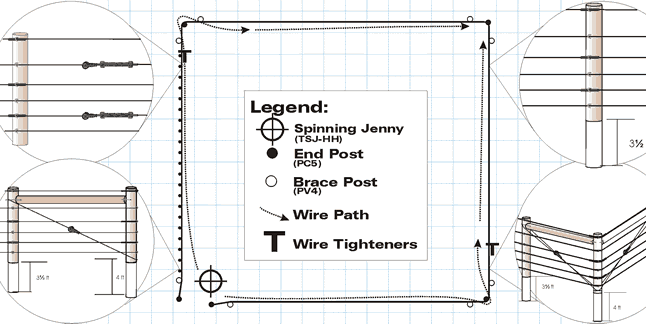
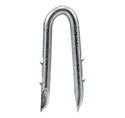
Cut the wire at the spinning jenny end post and thread the proper number of 4 inch tube insulators and wraparounds onto the wire in the order they will be used. (This was figured when counting posts between corners.) Include a few extra tubes in case they are needed at the brace wire on the end assemblies. They can be used to isolate your fence wire where it might touch any brace wires. Staple the bottom two wires to the posts. Be sure not to drive the staples tight against the wires. The staples should be placed over the tubes with the flat side against the post and the fins facing you. Drive the staples until they compress the fins slightly, but not so tight that they pinch the wire.
It is best to put staples horizontally above and below the wraparound insulator rather than straddling it. Finish installing wires, insulators and in-line wire tighteners. Wraparounds and tube insulators are only needed on the wires you will electrify.
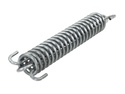
It is common to put a tension indicator spring onto one or more of the wires at the in-line wire tighteners. Two hundred fifty pounds is the recommended tension on non-electric style fences. The 1st notch on the heavy duty tension spring tug indicates 150 pounds of tension. The spring length will be about 7.25" on Kencove's Galfan coated springs. Tighten the wire until the end of the spring exposes the 2nd notch. The length of the spring will be a bit over 6 inches. If you know of a weak area in the fence, only tighten the wires enough to keep them from sagging. When you can't tighten to the full 250 pounds of tension, it becomes more important to keep the fence electrified.
This gives you a brief overview of building a basic six wire fence. Of course, these instructions can be adapted to fences of varying numbers of wire. If you want to use more than six wires, you will need to build double end and corner braces. Any questions regarding installation or maintenance are only a phone call away.
Do it yourself
The package listed above will do a 15 acre pasture (approximately 3280 feet perimeter) with a 16 foot gate opening at one corner, as in our sample diagram. Three wires are insulated for electric, with posts spaced at 25 foot centers. As with any packaged plan, measurements and materials are approximations. Your needs will vary. Price does not include labor, posts, spinning jenny, fencing tools or charger. Call for complete details on ordering and shipping information.
Tools
The tools most commonly used to build high-tensile fence.
Charger
If you do not already have a good fence charger, the following is recommended along with other components commonly used with electric high tensile fence
Charger Accessories
You will also need some additional products to connect the charger.
Subdivision fencing
The following components are suggested for permanent subdivision fencing. This fence is quickly installed and easy to maintain. This fence is usually constructed with one to three strands. Try it out.
Final subdivision
For the final subdivision, where the fence is to be moved every few days, try the following:
Related Items

- Indicates amount of tension on fence wire
- Class 3 galvanized coating
- Longest lasting spring on the market!
- Minimum break strength = 1,385 lbs
- Ideal for perimeter fences
- Hand knot or crimp
- Class 3 galvanized high-tensile

